
Showing posts with label princess. Show all posts
Showing posts with label princess. Show all posts
Saturday, January 14, 2012


Sunday, December 25, 2011
DIY Hand Painted Decorative Wine Glass. Fun & Funky!
What girl woman wouldn't LOVE one of these?! They are so much fun to make and super easy.

Supplies Needed:
-Wine glass (RUN to your local Hobby Lobby/Target/Walmart/Wherever Sells Wine Glass store
-Paint pens. These babies are good for SO many projects
-Feather Boa (again, Hobby Lobby). You can use one boa for multiple glasses
-Hot Glue
*************
Steps:
1-Clean & dry glass
2-Go to town decorating with your pens (for this one, I just copied the letter 'A' in Curlz font. If you've got a bit of a shaky hand, there are many stencils you can use to apply lettering. OR you can even use Scrapbook Stickers or Vinyl! It's your glass, decorate as you please!
3-Place the boa around the base of the glass, measuring how much you'll need (it's best to measure a little too much and then trim down than to underestimate and not have enough. Been there.)
4-Hot glue the boa down. Be generous with the amount of glue you use. If you're worried about the glue appearance underneath the glass, you could always Mod Podge some scrap book paper to it and write a personal note to the glass recipient.
5-Admire your work (this is the best step of all)
*Please note that this glass is for decorative purposes only. I wouldn't want to run a feather boa through my dishwasher..lol. I'd LOVE to see pictures!

Supplies Needed:
-Wine glass (RUN to your local Hobby Lobby/Target/Walmart/Wherever Sells Wine Glass store
-Paint pens. These babies are good for SO many projects
-Feather Boa (again, Hobby Lobby). You can use one boa for multiple glasses
-Hot Glue
*************
Steps:
1-Clean & dry glass
2-Go to town decorating with your pens (for this one, I just copied the letter 'A' in Curlz font. If you've got a bit of a shaky hand, there are many stencils you can use to apply lettering. OR you can even use Scrapbook Stickers or Vinyl! It's your glass, decorate as you please!
3-Place the boa around the base of the glass, measuring how much you'll need (it's best to measure a little too much and then trim down than to underestimate and not have enough. Been there.)
4-Hot glue the boa down. Be generous with the amount of glue you use. If you're worried about the glue appearance underneath the glass, you could always Mod Podge some scrap book paper to it and write a personal note to the glass recipient.
5-Admire your work (this is the best step of all)
*Please note that this glass is for decorative purposes only. I wouldn't want to run a feather boa through my dishwasher..lol. I'd LOVE to see pictures!
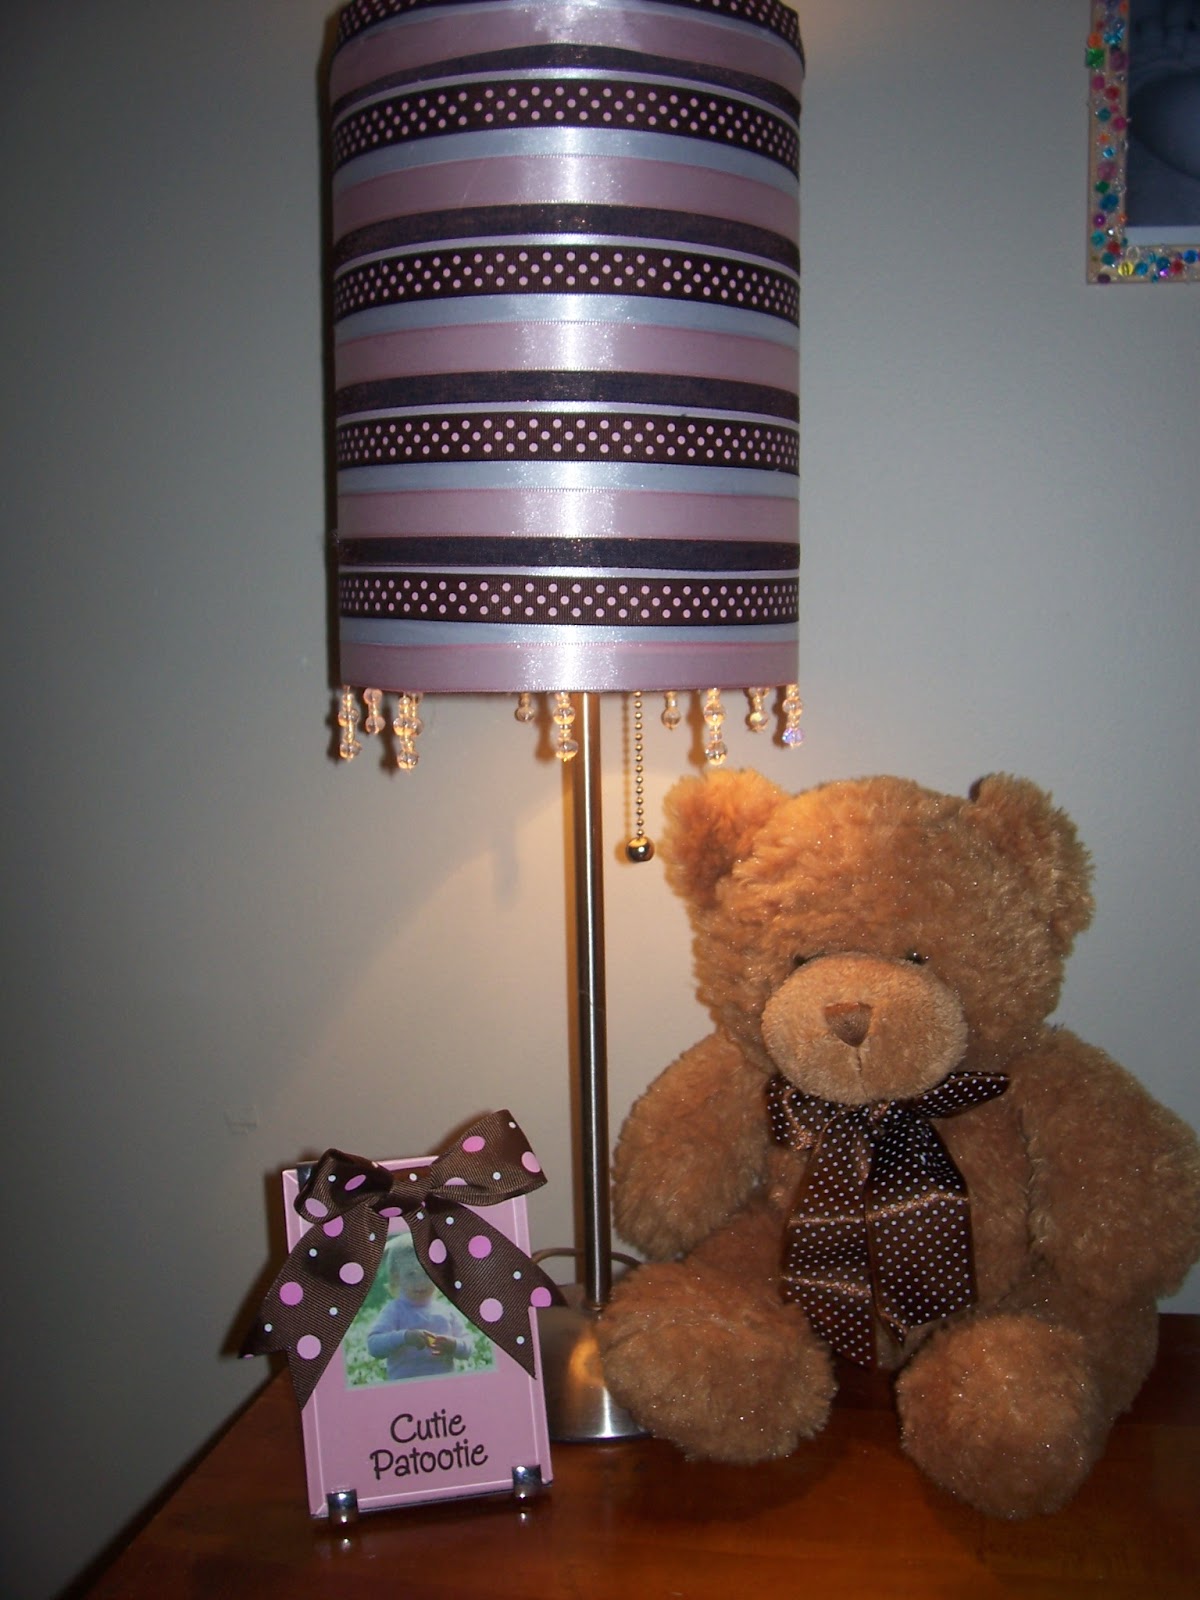
DIY Ribbon Covered Lamp Shades. Perfect idea for all ages!
A few years ago, I purchased a few drum lamps from Pier One Kids for a FRACTION of the price. They were cute..nothing special. At the time, I only had my first two daughters but bought three..for some crazy reason. When I found out I was pregnant with our third princess, I decided to try to get creative with the lamps--they needed some flair! Light this baby up in style! I bought a gorgeous nursery set online that neglected to come with a lamp, so the following is my solution!!

Supplies Needed:
1-Ugly Lamp
2-Lots and lots of cute & coordinating ribbon (varying sizes and textures looks great)
3-Glue Gun/Mod Podge may work BUT I've never tried it..just a thought
4-Lots of patience (and a steady hand. Burning your fingers with a glue gun will make you cuss like a sailor)
Steps:
1-Remove shade from base of lamp (seems obvious)
2-Begin to horizontally wrap the shade with your ribbon, gluing all the way along while wrapping. Try to keep the ends matching up at the same spot as the ribbon above it.
3-Wrap/Glue/Wrap/Glue (seriously..this can take some time)
4-You're getting there, I promise. It's almost done!
5- Once your entire base is covered, you'll want to take one longer piece of ribbon and glue it vertically along the shade, covering where the ribbon ends meet *this is why matching the ends is so important*
6-Tuck the ends of the ribbon underneath the inside of the shade (I'd recommend gluing about 1/2 in. on both ends, ensuring it will stay for long periods of time)
7-Attach your shade to the base of lamp (again..obvious)
8-Admire!! You did it!
I'd love to see pics of your variations of these shades. The one pictured has beads hanging from fishing wire..I glued them to the bottom of the shade and secured it with ribbon on the inside and outside of the shade..I love the dangling effect it gave!
Have fun!
Subscribe to:
Posts (Atom)